Showing posts with label recipes. Show all posts

Friday, March 29, 2013

Sweet treats

Daily Gratitude


Today I'm shining because I'm thankful for:
  • A job well done. Doesn't it feel great when you have a daunting project that you've taken head on. You work hard, maybe harder than you thought you'd have to. Then, it's finished. And, you're pleased with the results. Well, that's how I feel about a writing job I just completed. It feels great. 
  • My best friend's dog, Willie. Debbie's dog was a delightful friend to my family. He'd bound to the door when I arrived, carrying one of his precious toys as an offering. He'd bark for treats. He'd bark for a pat on the head. Willie's old body became too tired to stand on his long legs. He couldn't see well. His teeth were falling out. Other failures where happening as well. Yesterday, Willie went to sleep a sweet, happy dog. He will be missed for a very long time.
  • Bright colors. Yesterday I noticed people were wearing lively shades of green, blue, yellow and other colors. It's spring! And, we're wearing it well. 

Sweet Treats for my Kiddos


As a regular pinner to Pinterest, I see some pretty amazing things. Even though I don't have kids at home these days, I have a Kids Only board that I pin to. Weeks ago I saw a great treat called Trix Krispies and have thought about making them ever since. But, goodness, I couldn't justify making a whole batch of these goodies for myself! So, when Easter plans were being made, I jumped on the opportunity to try the recipe! They were super easy and quite delightful.


Trix Krispies


4 tablespoons butter
4.4 oz. bag mini marshmallows
10 cups Trix cereal

Place the butter and marshmallows in a large glass bowl and pop in the microwave for about 2 to 3 minutes to melt. Stir well. Mix in your Trix cereal and stir. Pour into a large greased pan (9 x 13 or 11 x 11) and press down with a spoon. Cut into squares. Serve with a colorful smile!

***

As I perused the posting for Easter treats, I saw several versions of Easter Bunny Bark. Ok, I had to make that as well. It was even easier than the Trix Krispies! This is my version of the recipe.


Easter Bunny Bark


1 pound white chocolate melting wafers
1 cup thin pretzel sticks, broken in half
1 cup M&M’s in pastel colors
1 cup salted peanuts
Sprinkles

Line a cookie sheet pan with waxed paper. Melt the white chocolate wafers over a pot of simmering water, whisking frequently until melted. Pour the melted chocolate over the prepared sheet pan. Sprinkle the pretzel sticks, M&M's, and peanuts over the chocolate. Mix in with a spatula. Then, spread evenly over the pan. Sprinkle with sprinkles. Let set at room temperature about 1 hour. Cut the bark at room temperature with a sturdy sharp knife. Yummy!

I think my family will gobble up these sweet treats quick like a bunny!

Monday, March 11, 2013

The first camping trip of the year

Daily Gratitude


I'm shining today because I'm grateful for:
  • An extra hour of day light in the evening. Not loving loosing an hour in the morning, but know that I will adjust in a couple of days.
  • Warm showers and washing machines. These were the two things I ran to immediately upon returning from my first camping trip of the season! 
  • The safety of both of my kids. Both Sarah and Morgan took trips and came home with great memories. I'm so thankful they've returned happy and sound.

Ah! The great outdoors! 


When friends learned that Mountain Girls Adventures Genia and I were going camping this weekend, they shook their heads like I was nuts and told me to keep warm.  Even the cashiers at Walmart and Winco Foods had funny, wondering looks on their faces. Why in the world would anyone want to go camping in early March?

Because there's adventure in going and doing! 


Camping is something I've done since I was a kid. Most of the time I've wilderness camped. That is, going into remote locations where there isn't another human in sight. Nor are there water and power hookups, restrooms, showers, or tidy tent pads. Occasionally, I will camp in a campground. Usually not by choice. However, this trip it was a great decision.

Genia has a long history of summer adventures at Farragut State Park in northern Idaho. And, while we packed plenty of gear for tent camping, she thought one or two nights in one of the cabins would be fun. She made a good choice!


This little cabin is just great! It includes bedding and a log table with two small benches. It's wired for power, so there were lights and a heater/air conditioner unit. It sleeps five, however we thought it was just great for two people with a dog. Fortunately, Genia is small, so she could fit the little bunk bed. Eddie and I were grateful for a full sized lower bunk. 


So, maybe it wasn't wilderness, tent camping. But, it was pretty close! We still had outdoor cooking and outhouses. We packed in our water and used our flashlights. And, campfire smoke permeated our clothes. It was camping.

While hot dogs, hamburgers and smores are the mainstay of most camping trips, I like to fix up healthy and fun food ahead of time. This trip I thought it would be fun to try new camping recipes. Here are a few:


Pumpkin Apple Pancakes

1 large egg
1 cup flour
1 cup milk
1/ cup canned pumpkin puree
1 teaspoon salt
1 teaspoon nutmeg
1 teaspoon cinnamon
1 apple peeled, cored, and shredded
2 tablespoons butter, divided
Syrup

Mix together all ingredients except butter and syrup in a bowl. Melt 2 teaspoons butter in a large nonstick frying pan over medium heat. Spoon batter by 1/3 cup portions into pan, making 3 or 4 pancakes at a time. Cook turning once, until cooked through, 8 to 10  minutes. Continue making pancakes with remaining batter, adding more butter to pan for each batch. Serve with syrup and more butter. Camping note: Mix dry ingredients and place in small ziploc bag. Mix all wet ingredients except apple and place in small ziploc bag. Place the two small ziploc bags, the whole apple, and measured butter all in a large ziploc together. Before preparing to mix and cook, peel, core and shred apple. 


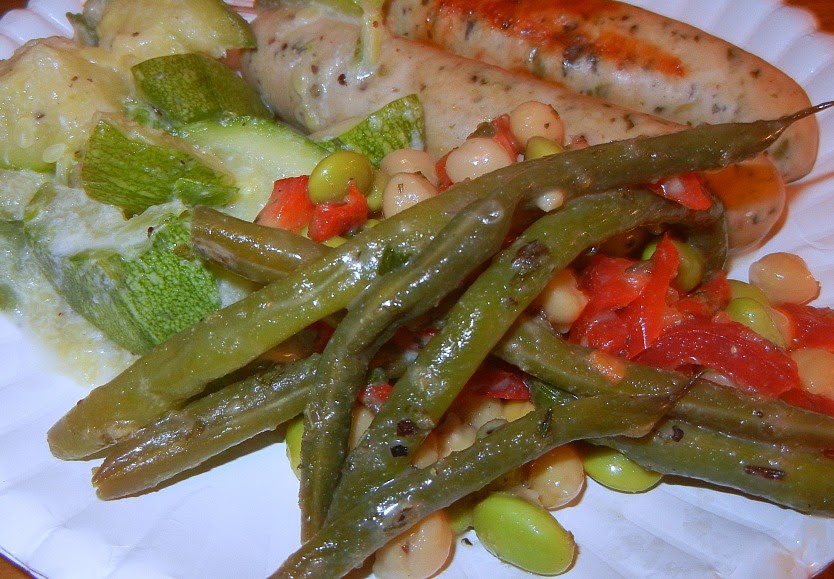
Mexican Squash

3 Mexican Squash
1/2 heavy cream
salt and pepper to taste

Coarsely chop squash. Place in pan with cream. Cover and simmer until squash is soft. Add salt and pepper. Serve!


Salade aux Trois Légumineuses (3 Bean Salad)

1 cup frozen shelled edamame, thawed
8 ounces of fresh French green beans
1 1/2 cups garbanzo beans, cooked and drained
1 medium red bell pepper, chopped
1/2 teaspoon salt
1/2 teaspoon pepper
1/4 shallots, chopped
1 tablespoon Herbs d'Provence
2 tablespoons Dijon mustard
1 tablespoon olive oil

Bring a large pan of water to boiling. Add edamame and green beans. Cook 4 minutes. Rinse with cold water and drain. Combine edamame, green beans, garbanzo beans, and red pepper a bowl. In a small bowl, combine shallots and remaining ingredients, stirring well with a whisk. Drizzled dressing over bean mixture and toss. Camping note: Place bean salad in a large ziploc bag or plastic container.


Curried Lentils

2 cup dried lentils
6 cups water
1 bay leaf
2 teaspoons olive oil
1 garlic clove, minced
2 teaspoons curry powder
1/2 teaspoon ground cumin
1/2 teaspoon salt
1 cup chopped tomato
1/2 teaspoon garlic chili paste
Sour cream
Fresh cilantro

In a medium pot, bring water, lentils, and bay leaf to boil. Cover and turn reduce heat for 20 minutes or until lentils are soft. Drain and discard bay leaf. In a separate pan, add oil, onion, and tomato. Saute until tender. Add garlic, curry powder, cumin, salt, and chili paste. Add lentils and cook and additional minute. Serve with a dollop of sour cream and garnish with fresh cilantro leaves.  Camping note: Place lentils in a large ziploc bag or plastic container. We topped the lentils with a bit of shredded cheese rather than sour cream and cilantro. 

Chipotle-Lime Mashed Yams

4 large yams (about 2 pounds)
1 tablespoon brown sugar
1 1/2 tablespoons butter
2 tablespoons milk
1 tablespoon fresh lime juice
1 1/2 tablespoons finely chopped chipotle chile in adobo sauce
1 tablespoon adobo sauce
1/4 teaspoon salt

Boil quartered yams in a large pot of water until soft. Drain and remove skins. Mash yams in a large bowl. Add remaining ingredients. Camping note: Place mashed yams in a large ziploc bag or plastic container. 

I didn't get a picture of this, but it was sure yummy!


Mashed Avocado with Hummus

2 cans drained garbanzo beans
1/2 cup olive oil
1/4 cup tahini
1 lemon, juiced
2 garlic cloves, minced
1/4 teaspoon cardamom
1 teaspoon salt
1 large, ripe avocado

In a food processor, make a coarse paste with the garbanzo beans. Add oil slowly as the processor continues to make the beans a thick paste. Add tahini and mix in. Add lemon, garlic, cardamom, and salt to make hummus. If serving immediately, smash avocado separately and stir into hummus. Camping note: Place hummus in a plastic container. Wait to mash and stir in avocado right before serving.

There were several more, but I'll post them on Mermaids in our next issue in May.


What a wonderful, beautiful, adventure-filled time! Coffee by the fire in the morning. Stars shining brightly against the dark, frozen sky at night.


Hiking around the hillsides and along the beaches.


Sharing the invigorating air, spectacular sights, and excellent conversation and laughter with a great friend.


What an exceptional way to start the season! 

Saturday, February 2, 2013

Soup's on the stove

Daily Gratitude


I'm shining today because I'm grateful for:
  • Blue nail polish. I know, seems silly. Yet, it brings a pop of color on a grey day. Little joys such as this really do make me happy. 
  • Train, the neighbor dog. OMG! He's the most beautiful, loving creature. Train is a pit-bulldog mix. His brindle coat is healthy and shiny. Eddie dog and Train tear around faster than lightening, yipping and barking with joy. Train is bigger than his buddy Eddie, but he is careful to not hurt him. When I come home, Train greets me with a big bark and lots of tail wagging. I love him.
  • Have I told you how much I love my bed? I have, haven't I. Well, I do. And, today I'm grateful for it again. 

Soup's on the Stove


It's a cold February afternoon and soup sounded like a good idea. Mmmmm, it was a fantastic idea! Before I forget what I put in the pot, I thought I'd share it here.


Cold Winter Soup


2 lbs. stew meat
2 T. olive oil
1 small onion, chopped
2 cloves garlic, minced
1 vegetable bouillon cube (no MSG)
32 oz. vegetable broth 
14.5 oz. can fire roasted tomatoes
3 carrots, chopped
2 stalks celery, chopped
2 cups kale, coarsely chopped
3.8 oz. can sliced black olives
15 oz. can kidney beans
Salt to taste

In a large pot, quickly brown the stew meat in olive oil. Toss in the onion and garlic to saute. Add bouillon and broth. Stir to break up bouillon cube. Add the tomatoes, carrots, celery, and kale. Turn down the heat to simmer and let cook for a couple of hours. Check that there is plenty of liquid. You may need to add a bit. Thirty minutes or so before serving, add black olives and kidney beans. Add salt as needed.


My tummy was so happy! I added an apple for a perfect lunch.


If I was serving it for dinner, I'd make up a batch of home baked bread or herbed biscuits to serve along side the soup. A nice green salad would do nicely as well.

Cold wintry weather is hot, hearty soup weather. It sure felt homey having soup on the stove!

Tuesday, December 18, 2012

'Tis the cookie season

Daily Gratitude

I'm shining today because I'm grateful for:
  • What an amazing birthday! This year I was blessed with a wonderful convergence of family and friends. While they thought to honor me on my special day with gifts and cake, their love for me and one another was the gift. My little condo was jam packed with laughs, hugs, and special words of blessing. The afterglow remains.
  • Peace while waiting. Last week I interviewed for a pretty awesome job. In the past, the wondering and fingernail biting killed me. This time, I feel calm and am resting in the fact that I did my best. And, that's that!
  • Did a little sewing on Grandma's machine. Damn, I love this Bernina!

Cookies!!!


Well, it's started. I know that many have all of their holiday sweets baked and packed in tins. This year I've postponed the cooking-making on purpose! Having all of my family here it would have been just too tempting to pull it all out and let them dive in. Nope, it's just better making fewer and keeping them for Santa.

The baking began with Grinch Chocolate and Mint Cookies. We have this recipe on Mermaids of the Lake as Mint Chocolate Chip Cookies. Mine are just a little different because I make them an ugly green Grinch-ish color.


Once cooled, I immediately bagged them and stashed them in the freezer. They are just too tempting! 


Grinch Chocolate and Mint Cookies


2 1/4 cups all-purpose flour
1 teaspoon baking soda
1 teaspoon salt
1 cup (2 sticks) butter, softened
3/4 cup granulated sugar
3/4 cup packed brown sugar
1 teaspoon vanilla extract
1/2 teaspoon mint extract
6 to 8 drops green food color
2 large eggs
1 cup semisweet chocolate chunks or chips
1 cup creme de menthe baking chips

Preheat oven to 375° F. Combine flour, baking soda and salt in small bowl. Beat butter, granulated sugar, brown sugar and vanilla extract in large mixer bowl until creamy. Add eggs, one at a time, beating well after each addition. Gradually beat in flour mixture. Stir in morsels and chips. Drop by rounded tablespoon onto ungreased baking sheets. Bake for 9 to 11 minutes or until golden brown. Cool on baking sheets for 2 minutes; remove to wire racks to cool completely.
***
From the vault comes the old-time family tradition of Russian Teacakes. Mom handed down the cookbook, as well as the love for these buttery, powdery, melt-in-your-mouth Christmas favorites.


Russian Teacakes


1 cup soft butter
1/2 cup powdered sugar
1 teaspoon vanilla extract
2 1/4 cup flour
1/4 teaspoon salt
3/4 cup finely chopped nuts

Mix butter, powered sugar, and vanilla. Stir in flour, salt, and nuts. Chill dough. Heat over to 400 degrees. Roll into 1-inch balls. Place on ungreased baking sheet. Bake 10 to 12 minutes until set, but not brown. While still warm, roll in powdered sugar. Cool. Roll in sugar again.


***
A relatively new classic in the family cookie line-up is the Double-Chocolate Crinkle. The cookbook has been in my collection since college, so it's not all that new!


Double-Chocolate Crinkles


4 ounces unsweetened chocolate
1/2 cup butter
2 cups sugar
2 teaspoon vanilla extract
4 eggs
2 cups flour
2 teaspoon baking powder
1/2 teaspoon salt
1 (6 oz) package chocolate chips
1 cup powdered sugar

Melt chocolate and butter together in the top of a double boiler over hot, but not boiling water. Stir in sugar. Place mixture in a medium blow; cool. Beat until blended. Add vanilla. Beat in eggs one at a time, mixing well after each addition. Stir in flour, baking powder, and salt. Stir in chocolate chips. Refrigerate dough several hours or overnight. To bake cookies, preheat oven to 375 degrees. Lightly grease baking sheets; set aside. Break off small pieces of chilled dough and form into 1-inch balls. Place powdered sugar in a shallow bowl. Roll cookies in sugar, covering them completely. Place cookies 2 inches apart on baking sheets. Bake 10 minutes. Cookies will be very soft, but will become firm as they cool. Immediately place on racks to cool.


***
There's more to come... just not tonight!